In the world of e-commerce, high-quality visuals play a crucial role in attracting customers and making sales. When it comes to clothing photography, capturing the essence and appeal of garments can be challenging. However, with the right techniques and tools, you can create stunning images that showcase every intricate detail of your products. In this article, we will delve into the ultimate clothing photography tips to help you master one specific aspect: neck joint effects. By understanding how to effectively apply these effects in post-production, you will be able to elevate your clothing images to a whole new level of professionalism and desirability. Get ready to take your clothing photography skills up a notch as we guide you through the intricacies of mastering neck joint effects!
Understanding Neck Joint Effects: An Overview
Types of Neck Joint Effects
There are several types of neck joint effects that can be achieved in clothing photography. The most common ones include:
- Basic Neck Joint: This effect is used to remove the mannequin or model from the garment, creating a ghost mannequin effect where only the clothing item is visible. It involves taking multiple photos of the front and back of the garment on a mannequin or model and then using photo editing software to combine these images seamlessly.
- Invisible Neck Joint: As the name suggests, this technique makes it appear as if there was never any support behind the garment. It requires careful editing to hide any traces of manipulation and create a natural-looking result.
- Extended Neck Joint: In some cases, it may be necessary to extend or elongate the neck area when photographing certain garments like turtlenecks or dresses with high collars. This effect is achieved by stretching and reshaping parts of the image so that it appears as if there is more length in the neck area than originally captured.
Importance of Neck Joint Effects
Neck joint effects play a crucial role in elevating clothing photography by ensuring that all attention is directed towards showcasing the garment itself rather than distractions like mannequins or models’ bodies. By removing these elements, customers can get an accurate representation of how the clothes will look on them when they wear them. The different types of effects allow photographers to choose which method best suits their specific needs and desired outcome for each individual photo shoot. Ultimately, mastering neck joint effects can enhance product visibility, increase customer engagement, and ultimately lead to higher sales conversions for fashion brands in today’s intensely competitive online marketplace.
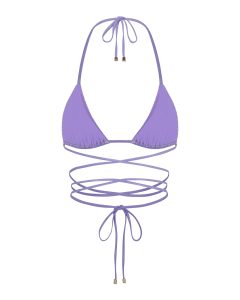
Choosing the Right Garments for Neck Joint Effects
Tips for Choosing the Right Garments for Neck Joint Effects
- Opt for garments made from lightweight and non-reflective materials to minimize glare in your clothing photography.
- Avoid choosing fabrics with distracting patterns or textures as they can take away attention from the product itself.
- Consider selecting garments that have a consistent color throughout, as this will make it easier to blend different images together seamlessly.
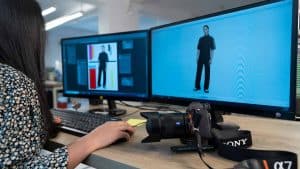
Setting Up the Perfect Studio for Clothing Photography
Setting up a well-organized studio is essential to achieve stunning clothing photographs. Here are some key tips to help you create the perfect setup:
- Lighting: Proper lighting is crucial when photographing clothes. Utilize soft, diffused lighting to minimize shadows and reflections on fabrics. Consider investing in studio lights or using natural light by positioning your shooting area near windows.
- Backdrop: Choose a plain, solid-colored backdrop that contrasts with the clothing items you will be photographing. Neutral shades like white or gray work well as they don’t distract from the garments.
- Mannequin or Model: Decide whether you want to showcase your clothes on mannequins or live models for added realism and versatility in showcasing different fits and styles.
- Clothing Preparation: Make sure each garment is properly prepared before shooting it; straighten out any wrinkles, remove price tags or hangers, and ensure there are no visible flaws that could negatively impact the final images.
- Tripod Stability: Using a tripod ensures stability while capturing clothing photographs at lower shutter speeds, reducing camera shake blur and resulting in sharper images.
Essential Equipment for Neck Joint Effects
To achieve professional-quality clothing photography with neck joint effects, you will need a few essential pieces of equipment:
- Camera – Invest in a high-resolution digital camera that allows manual control over settings like focus, exposure, and white balance. This will give you greater control over the final image quality.
- Tripod – Using a tripod ensures stability and prevents blur caused by shaky hands. It also allows you to maintain consistent framing throughout your shoot.
- Mannequin or Dress Form – A mannequin or dress form is crucial for achieving seamless neck joint effects. Choose one that closely matches the body shape and size of your target audience to create realistic-looking images.
- Clamps and Clips – These tools are useful for securing garments in place on the mannequin or dress form during the photoshoot. They help prevent unwanted movement and ensure smooth transitions between different garment elements in the final composite image.
Remember to have these items ready before starting your clothing photography session to ensure smooth execution and professional results.
Lighting Techniques for Creating Dramatic Neck Joint Effects
To create dramatic neck joint effects in clothing photography, proper lighting techniques are crucial. Here are some key strategies to consider:
- Play with shadows: Experiment with the placement and intensity of your light source to cast intriguing shadows on the garment’s neckline and collar area. This can add depth and dimension, exaggerating the effect of a neck joint.
- Use side lighting: Positioning lights at an angle from both sides can create a striking contrast between light and shadow, emphasizing the presence of any seams or stitches along the neck area.
- Highlight details: Utilize spotlights or focus lights on strategic areas such as buttons, zippers, or embellishments near the neck region to draw attention while retaining overall coherence in the photograph.
Remember that mastering neck joint effects requires patience and practice; don’t be afraid to experiment with different setups until you achieve your desired result.
Mastering the Art of Mannequin and Ghost Mannequin Photography
When it comes to clothing photography, mannequins play a crucial role in showcasing how garments fit and drape on the body. But traditional mannequins can sometimes be distracting or take away attention from the clothing itself. That’s where ghost mannequins come in – they allow you to create a seamless look by digitally removing parts of the image that would normally be covered by a traditional mannequin.
To achieve professional-looking results with both types of mannequins, there are a few key tips to keep in mind:
- Positioning is key: Place your mannequin at an angle that showcases the garment’s best features, such as its neckline or sleeves.
- Proper lighting: Use diffused light sources placed strategically around your product to eliminate shadows and highlight details.
- Attention to detail: Iron out any wrinkles or creases before shooting. A clothes steamer can be immensely helpful for achieving smooth, polished looks.
By mastering these techniques and using either traditional or ghost mannequins effectively, you’ll be well on your way to creating stunning apparel images that captivate potential customers and ultimately drive sales.
Step-by-Step Guide to Achieving Seamless Neck Joint Effects
Preparing the Clothing Item for Photography
- Before starting the photoshoot, make sure to steam or iron the clothing item to remove any wrinkles and creases.
- Use a mannequin or a model to display the clothing item in a natural and flattering way.
- Position the clothing item correctly on the mannequin or model, paying attention to details such as collar placement and symmetry.
Capturing Multiple Shots
- Take photographs of both the front and back of the clothing item separately.
- To achieve seamless neck joint effects, it is crucial to capture additional shots of just the neckline area without any obstructions like collars or tags.
- Remember to maintain consistency with lighting, background, and camera settings across all shots.
Editing Techniques for Seamless Neck Joint Effects
- Open your photo editing software and import all relevant images from your photoshoot.
- Begin by carefully removing any unwanted distractions such as strings or tags using tools like clone stamp or healing brush.
- Layer one front image onto another back image by aligning their necklines perfectly using tools like auto-align layers in Photoshop.
- Erase part of the top layer around where you want to join them seamlessly – giving it an invisible effect that merges flawlessly into one cohesive garment photograph.
By following these step-by-step instructions, achieving seamless neck joint effects in clothing photography will become an attainable goal for photographers at any skill level!
Utilizing Photoshop Tools for Neck Joint Effects
Using Photoshop Tools for Neck Joint Effects
To achieve seamless neck joint effects in clothing photography, Photoshop offers several essential tools and techniques.
- Cloning Tool: Use the Clone Stamp tool to remove mannequin or model distractions from the image. This tool allows you to duplicate a part of the background and cover up any visible seams or gaps.
- Healing Brush Tool: The Healing Brush tool is perfect for correcting imperfections on fabric, such as wrinkles or stains. Simply select a nearby area with similar texture and color, then paint over the problem area to blend it seamlessly.
- Transform Tools: Utilize Photoshop’s Transform tools to resize and reshape parts of the garment that need adjustment after removing the mannequin or model. The Liquify filter can also be used for more precise adjustments, ensuring a natural-looking fit.
Remember to always work on a separate layer when using these tools so that you can make changes without damaging your original image. Taking advantage of these powerful Photoshop features will help you master neck joint effects in your clothing photography, resulting in professional-looking images every time!
Advanced Editing Techniques for Perfecting Neck Joint Effects
When it comes to achieving flawless neck joint effects in clothing photography, these advanced editing techniques can help take your images to the next level:
- Seamlessly blend the edges: To create a natural-looking join between the images of the front and back of a garment, use editing software like Adobe Photoshop to carefully erase any visible seams or rough edges. By meticulously blending these areas together, you can achieve a seamless transition that enhances the overall appearance of the clothing.
- Adjust shadows and highlights: To ensure consistency throughout your image, adjust shadows and highlights in both halves of the garment. This will help maintain a balanced tone and prevent unnatural variation between different parts of the shot.
- Pay attention to lighting and shadow direction: Make sure that lighting and shadow direction are consistent across both halves of your image. Adjusting these elements can create realistic depth and dimension in your final composite photo.
By mastering these advanced editing techniques, you will be able to enhance the visual appeal of neck joint effects in clothing photography while maintaining a professional finish to captivate viewers with stunning visuals.
Common Mistakes to Avoid in Neck Joint Photography
1. Poor lighting:
One of the most common mistakes in neck joint photography is using inadequate or improper lighting. To achieve a seamless and professional-looking effect, it’s essential to have consistent and even lighting across all elements of the image. Use diffused light sources or softboxes to minimize shadows and create a uniform look.
2. Incorrect positioning:
Another mistake often made is not properly aligning the clothing item with the mannequin or model. Ensure that the clothing is correctly positioned, centered, and symmetrical on the mannequin or body part being photographed. This will help maintain proportionality when merging images together later on.
3. Inconsistent angles:
Using inconsistent angles while photographing various parts of a garment can make it difficult to seamlessly merge them together during post-processing. Be mindful of maintaining consistent camera height, distance, and angle throughout your photoshoot to avoid any discrepancies when combining images for the neck joint effect.
Remember that perfecting neck joint photography requires attention to detail and precise technique- by avoiding these common mistakes, you’ll be well on your way to achieving stunning results!
Tips for Consistency in Neck Joint Effects Across Product Shots
To ensure consistency in neck joint effects across product shots, consider the following tips:
- Maintain consistent lighting: Lighting plays a significant role in creating uniformity across images. Use the same lighting setup and position for each product shot to achieve consistent results.
- Keep camera angles consistent: Maintaining the camera angle is crucial to create a seamless effect. Make sure to align the camera at the same level and distance from each product when capturing the shots.
- Pay attention to clothing placement: Properly aligning and positioning of clothing items is essential. Ensuring that garments are placed similarly on mannequins or models will help maintain consistency throughout all images.
- Use a tripod: A sturdy tripod can assist in keeping your camera steady during multiple shots, minimizing variations caused by accidental movements.
- Match editing settings: Consistent post-processing editing settings, such as color adjustments, contrast levels, and sharpness enhancements, will ensure coherence across all images.
Following these tips will help you maintain consistency in neck joint effects across your catalogue of clothing photography, giving it a polished and professional look.
Showcasing Neck Joint Effects: Before and After Examples
Enhancing the Appearance of Clothing through Neck Joint Effects
Neck joint effects are a crucial technique in clothing photography that can greatly enhance the appearance of garments. By removing mannequins or models from the images and joining different parts of clothing together using post-processing techniques, photographers can create more appealing visuals for online stores or catalogs.
Before: Dull and Lifeless Images
Before applying neck joint effects, clothing images often lack vibrancy and fail to capture attention. With mannequins included, it is challenging to showcase the full details and features of clothes. These unappealing visuals may result in reduced customer interest and lower sales conversion rates.
After: Dynamic Visuals with Impeccable Detail
After applying neck joint effects, images transform into dynamic visuals that highlight every intricate detail on a garment. The removal of mannequins allows customers to see how the clothing drapes naturally on a human body, enabling them to easily envision themselves wearing it. The resulting photographs not only capture attention but also provide potential buyers with alluring visuals that drive engagement and increase sales conversions.
In conclusion, mastering neck joint effects is essential for successful clothing photography as they play a significant role in creating captivating visuals that resonate with customers.